블로그 이미지
박황기
최근에 스마트폰에 관심이 많습니다. 예전에 상상하던 모습들이 점차 이루어지고 있는게 신기하네요.

calendar

1 2 3 4 5 6 7
8 9 10 11 12 13 14
15 16 17 18 19 20 21
22 23 24 25 26 27 28
29 30

Notice

2012. 1. 11. 10:23 모바일

출처(source) : http://www.vogella.de/articles/JavaAlgorithmsShuffle/article.html

Shuffle an Array or a List - Algorithm in Java

Lars Vogel

Version 0.1

17.05.2009

Revision History
Revision 0.1 17.05.2009 Lars Vogel
Created

Abstract

This article describes how to shuffle the content of an array or a list in Java. After the shuffle the elements in the array or the list are randomly sorted.


1. Shuffle an array with the Collections framework

An array or an java.util.list contains a sorted list of values. Shuffling an array or a list means that you are randomly re-arranging the content of that structure. Have you wondered how you could shuffle an array or a list without the collection framework? This article demonstrates how the shuffling works so that you can learn how the standard libraries might do this.

Tip

If you only interested in shuffling with the collections framework you should of course use the standard Java. Use Collections.shuffle(list) to shuffle a list with the standard Java library or Collections.shuffle(Arrays.asList(a)) to shuffle an array a.

The approach works independent of the content of the array or the list.

The shuffle is random as the algorithm by selecting uniformly en element which has not been selected. For example if the element at position 2 is selected it can be exchanged with all elements at position 2 until position n-1 (as the list /array has 0 - n-1 positions).

2. Implementation in Java

Create a Java project "de.vogella.algorithms.shuffle".

Create the following program for sorting arrays.

			
package de.vogella.algorithms.shuffle;

import java.util.Random;

public class ShuffleArray {
	public static void shuffleArray(int[] a) {
		int n = a.length;
		Random random = new Random();
		random.nextInt();
		for (int i = 0; i < n; i++) {
			int change = i + random.nextInt(n - i);
			swap(a, i, change);
		}
	}

	private static void swap(int[] a, int i, int change) {
		int helper = a[i];
		a[i] = a[change];
		a[change] = helper;
	}

	public static void main(String[] args) {
		int[] a = new int[] { 1, 2, 3, 4, 5, 6, 7 };
		shuffleArray(a);
		for (int i : a) {
			System.out.println(i);
		}
	}
}


Create the following program for sorting list.

			
package de.vogella.algorithms.shuffle;

import java.util.ArrayList;
import java.util.List;
import java.util.Random;

public class ShuffleList {
	public static void shuffleList(List<Integer> a) {
		int n = a.size();
		Random random = new Random();
		random.nextInt();
		for (int i = 0; i < n; i++) {
			int change = i + random.nextInt(n - i);
			swap(a, i, change);
		}
	}

	private static void swap(List<Integer> a, int i, int change) {
		int helper = a.get(i);
		a.set(i, a.get(change));
		a.set(change, helper);
	}

	public static void main(String[] args) {
		List<Integer> list = new ArrayList<Integer>();
		list.add(1);
		list.add(2);
		list.add(3);
		list.add(4);
		list.add(5);
		list.add(6);
		list.add(7);
		shuffleList(list);
		for (int i : list) {
			System.out.println(i);
		}
	}
}


Why does this shuffle all values randomly? The value at position 0 is exchanged with a randomly selected value (including the original value at position 0). This means that after the first loop position 0 has a random value with an equal likelihood of any value. We continue this with position 1 but we do not need to consider position 0 again as this position already has a random value assigned. After the loop it is equally likely that any value is at any position.

3. Thank you

Please help me to support this article:

posted by 박황기
2011. 12. 22. 22:42 Project/HiApps Team

이름             :    내님의 비밀문자함(Secret My SMS Box)
분류             :    분류 (라이프스타일)
가격             :    무료
언어             :    한국어 지원
제작자         :    HiApps Team
지원버전     :     2.1 이상
스토어         :    안드로이드 마켓
상세정보     :    https://market.android.com/details?id=net.hiapps.nimsmsbox


나의 소중한 내님의 문자와 통화내역을 잠금 관리 하세요!
수많은 통화나 문자기록중에 내님만의 내역을 따로 관리 할수있습니다.


★ 전체기능
1.내님과 문자또는 통화건수의 통계 보기
  누가더 많이 연락했는지 백분율로 그래프로 보여줍니다.
2.내님의 문자함 저장/삭제
3.내님의 통화내역 저장/삭제
4.별명설정 및 프로필 사진 설정 기능
5.내님의 전화나 문자 수신시 notification으로 알려줍니다.


★ 사용방법
1.처음 설치시 또는 설정관리에서 내님의
  전화번호를 설정합니다.

2. 전화번호 설정후 등록된 전화번호에 해당하는
   전화나 문자가 오면 내님의 비밀문자함에
   내역이 등록이 됩니다.

3. 다른사람이 못보도록 설정관리에서 비밀번호를
   설정하면 어플종료후 재실행시 비밀번호를
   입력하셔야만 보실수 있습니다.


★ 주의
 - 문자나 전화는 내부기능만 연결되어 있습니다.
   전화통화나 문자는 휴대폰 사용시와 동일하게 차감되며
   무료는 아닙니다.
 - MMS는 지원하지 않습니다.
 - SMS전송시에는 어플 내부의 전송기능을 사용할때만
   내님의비밀문자함에 기록되며 어플을 통하지 않은
   문자전송시에는 기록되지 않습니다.


nimbox0.pngnimbox5.png

nimbox6.png nimbox7.png


★ 다운로드

https://market.android.com/details?id=net.hiapps.nimsmsbox


    codeImage_z63m_m.png


★문의사항이나 개선의견은 메일로 알려주세요.
이메일 : hiapps.net@gmail.com

posted by 박황기
2011. 10. 15. 08:38 Project/HiApps Team

이름             :    비전보드(꿈을 위한 포토 다이어리)

분류             :    분류 (라이프스타일)
가격             :    무료

언어             :    한국어 지원
제작자         :    HiApps Team
지원버전     :     2.1 이상
스토어         :    안드로이드 마켓
상세정보     :    https://market.android.com/details?id=net.hiapps.visionboard


[어플리케이션 설명] 
Vision Board는집안의 큰액자에 내가 동경하는 인물사진,살고싶은집,
사랑하는 가족,애인등을 붙여놓고 보는것처럼 기록하고 볼수있습니다

자신이 생각한대로 목표를 설정하고 목표를 향해 긍정적으로 생각하고
집중하고 그방향대로 실천함으로 인해서 꿈를 이룰수 있을것 입니다.


Vision Board는집안의 큰 액자에 내가 동경하는 인물사진, 살고싶은
넓은 집,사랑하는 가족, 애인 등을 붙여 놓고 보는것 처럼 스마트폰에
해당 사진을 등록하고 꿈의 내용을 기록하고 수시로 볼 수 있습니다.


★ 특징
1.비전보드를 본 회수 통계 관리

   -  사진을본 회수/꿈을 성취한 회수 보기
   -  오늘의 사진보기 목표 회수 설정
   -  5단계 비전트리(본회수에 따라서 나무성장 그림 표시 )

2.그룹별 사진관리

  - 그룹등록/수정/삭제/사진 그룹이동

3.사진별 메모 등록

3.나만의 꿈을 위한 어플 잠금 관리

  - 나만 사진을 관리하고 볼수 있도록 어플 잠금 설정 기능.

  - 비전보드에 등록된 사진은 SD카드에 특정 폴더에 복사 저장 되므로

    스마트폰 기본 앨범에 있는 사진을 지워도 사진을 볼 수 있음.

    (SD카드 사진 저장 경로 : sdcard/net.hiapps.visionboard/photo/)
4.그룹안의 사진들을 반복해서 볼수 있도록 슬라이드쇼 기능

5.페이스북공유및, 사진 배경화면 설정 기능


0.png 2.png

6.png 10.png


★ 다운로드

https://market.android.com/details?id=net.hiapps.visionboard


비전보드_QR코드.jpg


★문의사항이나 개선의견은 메일로 알려주세요.
이메일 : hiapps.net@gmail.com

posted by 박황기
2011. 8. 12. 17:21 모바일/안드로이드

* source : http://developer.android.com/reference/android/text/TextWatcher.html


Class Overview

When an object of a type is attached to an Editable, its methods will be called when the text is changed.

Summary

Public Methods
abstract void afterTextChanged(Editable s)
This method is called to notify you that, somewhere within s, the text has been changed.
abstract void beforeTextChanged(CharSequence s, int start, int count, int after)
This method is called to notify you that, within s, the count characters beginning at start are about to be replaced by new text with length after.
abstract void onTextChanged(CharSequence s, int start, int before, int count)
This method is called to notify you that, within s, the count characters beginning at start have just replaced old text that had length before.

Public Methods

public abstract void afterTextChanged (Editable s)

Since: API Level 1

This method is called to notify you that, somewhere within s, the text has been changed. It is legitimate to make further changes to s from this callback, but be careful not to get yourself into an infinite loop, because any changes you make will cause this method to be called again recursively. (You are not told where the change took place because other afterTextChanged() methods may already have made other changes and invalidated the offsets. But if you need to know here, you can use setSpan(Object, int, int, int) in onTextChanged(CharSequence, int, int, int) to mark your place and then look up from here where the span ended up.

public abstract void beforeTextChanged (CharSequence s, int start, int count, int after)

Since: API Level 1

This method is called to notify you that, within s, the count characters beginning at start are about to be replaced by new text with length after. It is an error to attempt to make changes to s from this callback.

public abstract void onTextChanged (CharSequence s, int start, int before, int count)

Since: API Level 1

This method is called to notify you that, within s, the count characters beginning at start have just replaced old text that had length before. It is an error to attempt to make changes to s from this callback.

posted by 박황기
2011. 8. 9. 10:32 모바일/안드로이드
* 출처 (Source) : http://www.helloandroid.com/tutorials/how-send-email-your-application


How to send email from your application


SDK Version: 
M3

Today we'll create an easy email sender application.
First of all we need to create a layout to set the address, the subject and email body box.

  1. <?xml version="1.0" encoding="utf-8"?><LinearLayout android:id="@
  2.  
  3. +id/LinearLayout01" android:layout_width="fill_parent"
  4.  
  5. android:layout_height="fill_parent"
  6.  
  7. xmlns:android="http://schemas.android.com/apk/res/android"
  8.  
  9. android:orientation="vertical"><LinearLayout android:id="@+id/LinearLayout02";
  10.  
  11. android:layout_width="wrap_content" android:layout_height="wrap_content"
  12.  
  13. android:orientation="horizontal"><EditText android:layout_width="wrap_content"
  14.  
  15. android:layout_height="wrap_content" android:width="170dip" android:id="@
  16.  
  17. +id/emailaddress"></EditText><TextView android:layout_width="wrap_content"
  18.  
  19. android:layout_height="wrap_content" android:id="@+id/emailaddress"
  20.  
  21. android:text="Email address"></TextView>
  22. </LinearLayout>
  23.  
  24.  
  25. <LinearLayout android:id="@+id/LinearLayout03";
  26.  
  27. android:layout_width="wrap_content" android:layout_height="wrap_content"
  28.  
  29. android:orientation="horizontal"><EditText android:layout_width="wrap_content"
  30.  
  31. android:layout_height="wrap_content" android:width="170dip" android:id="@
  32.  
  33. +id/emailsubject"></EditText><TextView android:layout_width="wrap_content"
  34.  
  35. android:layout_height="wrap_content" android:id="@+id/emailsubject"
  36.  
  37. android:text="Subject"></TextView>
  38. </LinearLayout>
  39. <EditText android:layout_width="wrap_content"
  40.  
  41. android:layout_height="wrap_content" android:lines="5" android:width="300dip"
  42.  
  43. android:id="@+id/emailtext"></EditText>
  44. <Button android:layout_width="wrap_content" android:layout_height="wrap_content"
  45.  
  46. android:id="@+id/emailsendbutton&quot; android:text="Send!"
  47.  
  48. android:width="150dip"></Button>
  49. </LinearLayout>

Ugly, but works...
Next we create a new class, called ....uhhhm...Email, then modify like this:

  1. import android.app.Activity;
  2. import android.content.Intent;
  3. import android.os.Bundle;
  4. import android.view.View;
  5. import android.view.View.OnClickListener;
  6. import android.widget.Button;
  7. import android.widget.EditText;
  8.  
  9. public class Email extends Activity {
  10.         Button send;
  11.         EditText address, subject, emailtext;
  12.     @Override
  13.     public void onCreate(Bundle savedInstanceState) {
  14.         super.onCreate(savedInstanceState);
  15.         setContentView(R.layout.email);
  16.         send=(Button) findViewById(R.id.emailsendbutton);
  17.         address=(EditText) findViewById(R.id.emailaddress);
  18.         subject=(EditText) findViewById(R.id.emailsubject);
  19.         emailtext=(EditText) findViewById(R.id.emailtext);
  20.        
  21.         send.setOnClickListener(new OnClickListener() {
  22.                        
  23.                         @Override
  24.                         public void onClick(View v) {
  25.                                 // TODO Auto-generated method stub
  26.                                  
  27.                                       final Intent emailIntent = new Intent(android.content.Intent.ACTION_SEND);
  28.                                
  29.                                       emailIntent.setType("plain/text");
  30.                                  
  31.                                       emailIntent.putExtra(android.content.Intent.EXTRA_EMAIL, new String[]{ address.getText().toString()});
  32.                                
  33.                                       emailIntent.putExtra(android.content.Intent.EXTRA_SUBJECT, subject.getText());
  34.                                
  35.                                       emailIntent.putExtra(android.content.Intent.EXTRA_TEXT, emailtext.getText());
  36.                        
  37.                                     Email.this.startActivity(Intent.createChooser(emailIntent, "Send mail..."));
  38.  
  39.                         }
  40.                 });
  41.     }
  42. }

It will use the button's onclicklistener method to send the email. It does not work on emulator, but works on real devices.

'모바일 > 안드로이드' 카테고리의 다른 글

[링크]AsyncTask and AsyncTaskLoader  (1) 2012.11.29
TextWatcher  (0) 2011.08.12
Android SDK Quick Tip: Sending Pictures the Easy Way  (0) 2011.08.09
Debug Certificate expired  (1) 2011.07.06
[안드로이드] achartengine  (0) 2011.04.21
posted by 박황기
2011. 8. 9. 10:15 모바일/안드로이드

* 출처 : Source (http://mobile.tutsplus.com/tutorials/android/android-sdk-sending-pictures-the-easy-way/)


Android SDK Quick Tip: Sending Pictures the Easy Way

Android SDK Quick Tip: Sending Pictures the Easy Way

Tutorial Details
  • Technology: Eclipse + Android SDK
  • Difficulty: Beginner
  • Completion Time: 10 - 15 Minutes

This quick tip shows you how to configure and send a picture to someone (for example, an MMS message). You will achieve this by creating and configuring the appropriate Intent within an application’s Activity, enabling the user to send the picture using their picture messaging application of choice.

Step 1: Creating an Android Application

Begin by creating an Android project. Once you have a project set up and the application running, decide under what circumstances you want to send picture content. Will this occur when a Button is pressed? Implement the necessary Button control, including any click handling. Once you have completed this task, you have a place to drop in the code to send a picture somewhere. Now you are ready to proceed with this quick tip.

The code for this quick tip is available as an open source project.

You will need to make sure you’ve got at least one working messaging application installed (like Messaging). This is best done using a real Android device, as opposed to the emulator.

Warning: Sending MMS messages may incur fees, depending on your phone plan.

Step 2: Creating the Intent

Mail applications can be launched to send a message with the following Intent: android.content.Intent.ACTION_SEND. Begin by creating this Intent within your Button click handler:

  1. Intent picMessageIntent = new Intent(android.content.Intent.ACTION_SEND);  

This is a very generic Intent type. Basically, it tells the Android system that your application wants to send some sort of data somewhere—the ACTION_SEND Intent can be used to send different types of messages such as text messages (SMS) and picture messages (MMS), emails, etc. One common use of the ACTION_SEND Intent is to send plain text messages like emails, as we discussed in a previous Quick Tip.

Step 3: Saving a Picture File to the Device

The graphic file must be accessible to both the applications—your application and the messaging application. Since you cannot be sure which application will be sending the picture, you should make sure the graphic is stored in a public place. One of the simplest places to store data is on external storage (the SD card) in the public directory. For simplicity’s sake, we’ll simply use the Browser application to save an image to the SD card and then access it for use within the Intent code.

To save an image to the SD card, launch the Browser application and find an image. For this example, we downloaded the q.jpeg graphic from our book website. To download an image in the Browser, long-press on the image and choose Save Image. Note the name of the graphic in the Notification bar.

Step 1 Picture

In practice, your app can create or download an image however it likes. Images are best stored in a common place, though, so any app can access them. For instance, the Browser app does this and we’re leveraging that here.

Step 4: Configuring the Intent Type

In order to use this ACTION_SEND Intent to send a picture, you will need to add some additional configuration information. Specifically, you need to set the type of the Intent using the setType() method to the appropriate MIME type of the graphic file. For example, to send a JPEG image, you would set the type (lowercase) of the Intent as follows:

  1. picMessageIntent.setType("image/jpeg");  

Step 5: Generating a Picture URI

You know the filename of the picture. You can use this information to generate a Uniform Resource Identifier (Uri) that describes the location of the file and pass this Uri to the Intent. In this case, the downloaded picture is the cover of our most recent book (q.jpeg). To supply the Intent with the Uri to the picture to include in the message, you must use the extra called Intent.EXTRA_STREAM.

But where is the picture? In order to generate the correct Uri, you can use the handy Environment class, which has a method to help identify the appropriate download directory in the public directory hierarchy of the SD card. The following code creates the Intent and configures the extras to include a picture called q.jpeg, which must exist in the public user downloads directory of the SD card:

  1. Intent picMessageIntent = new Intent(android.content.Intent.ACTION_SEND);   
  2. picMessageIntent.setType("image/jpeg");   
  3.   
  4. File downloadedPic =  new File(   
  5.     Environment.getExternalStoragePublicDirectory(   
  6.     Environment.DIRECTORY_DOWNLOADS),   
  7.     "q.jpeg");   
  8.   
  9. picMessageIntent.putExtra(Intent.EXTRA_STREAM, Uri.fromFile(downloadedPic));  

Step 6: Launching the Intent

When you launch this Intent, any applications that support sending will be able to handle the request. Simply call the startActivity() method, passing in your Intent:

  1. startActivity(picMessageIntent);  

The details of how the picture is handled depend upon the application chosen to handle the Intent. If the user chooses the Messaging application, the picture is converted into an MMS message. If the user chooses an email application, the picture will be sent as an attachment.

Step 2 Picture

Step 7: Handling When Multiple Applications Can Handle Picture Messages

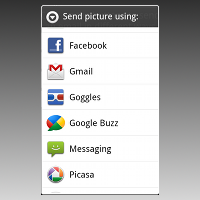
Users can install any number of Android applications on their devices. Often, they install multiple messaging and image sharing applications. You can allow the user to choose which application to handle the Intent by supplying the startActivity() call with createChooser() method:

  1. startActivity(Intent.createChooser(picMessageIntent, "Send your picture using:"));  

As you can see, many popular applications can send pictures using the ACTION_SEND Intent.

Step 3 Picture

Conclusion

In this quick tip you have learned how to configure an Intent to send an picture message. Depending on which application handles the ACTION_SEND Intent, the message might be sent as an MMS message, an email with a picture attachment, or using some other application’s picture sending protocol. The user still has ultimate control and flexibility on whether or not to send the message and how it is sent.

About the Authors

Mobile developers Lauren Darcey and Shane Conder have coauthored several books on Android development: an in-depth programming book entitled Android Wireless Application Development and Sams TeachYourself Android Application Development in 24 Hours. When not writing, they spend their time developing mobile software at their company and providing consulting services. They can be reached at via email to androidwirelessdev+mt@gmail.com, via their blog at androidbook.blogspot.com, and on Twitter @androidwireless.

'모바일 > 안드로이드' 카테고리의 다른 글

TextWatcher  (0) 2011.08.12
How to send email from your application  (0) 2011.08.09
Debug Certificate expired  (1) 2011.07.06
[안드로이드] achartengine  (0) 2011.04.21
Learn To Save and Load External Images in Google Android  (0) 2011.01.18
posted by 박황기
2011. 7. 6. 14:36 모바일/안드로이드
오류가 전혀 없는 프로젝트 파일이 갑자기 빨간색 표시가 되면서
빌드가 되지 않아서 확인해 보니
안드로이드 debug.keystore가 만료 되었다.
debug.keystore파일을 삭제후 다시 재실행해서 갱신해준다.


Description Resource Path Location Type
Error generating final archive: Debug Certificate expired on 11. 7. 5 오전 10:19   Unknown Android Packaging Problem


posted by 박황기
2011. 6. 9. 08:45 모바일/HTML5

'모바일 > HTML5' 카테고리의 다른 글

How to Make an HTML5 iPhone App  (0) 2010.03.29
posted by 박황기
2011. 4. 21. 16:10 모바일/안드로이드

http://code.google.com/p/achartengine/

AChartEngine is a charting library for Android applications. It currently supports the following chart types:

  • line chart
  • area chart
  • scatter chart
  • time chart
  • bar chart
  • pie chart
  • bubble chart
  • doughnut chart
  • range (high-low) bar chart
  • dial chart / gauge
All the above supported chart types can contain multiple series, can be displayed with the X axis horizontally (default) or vertically and support many other custom features. The charts can be built as a view that can be added to a view group or as an intent, such as it can be used to start an activity.

AChartEngine is currently at the 0.6.0 release. New chart types will be added in the following releases. Please keep sending your feedback such as we can continually improve this library.

posted by 박황기
2011. 3. 2. 22:45 Project/HiApps Team

[앱/무료] 내님의 정각알림

이름           : 내님의 정각알림
분류           : 생활(Life Style)
가격           : 무료(광고)/유료(광고제거버전 T스토어 예정)
언어           : 한국어 지원
제작자       : HiApps Team
지원버전   : 2.1 이상
스토어       : 안드로이드 마켓
 

■ [상세설명]


사랑하는 내 님(애인, 아기, 강아지)의 목소리로
매일, 매시간 기분 좋게 시작하세요!

상쾌하게 나의 아침을 열어주는 소리,
매 시간 함께 있는 듯 나를 미소짓게 하는 소리,
퇴근을 알리는 기분 좋은 소리까지...
사랑하는 애인, 내 아이, 내 강아지 등의
소리로 녹음하여 사용할 수 있습니다.


★ 특징

- 정각알림 + 알람기능(기본시간음,테마음은 1회 재생, 사용자 추가음은 반복재생 )
- 알림소리 녹음 기능/ 음악파일 불러오기 기능

- 요일 지정 기능
- 정각 외에 특정 시간 추가 기능 (ex.12시30분)
- 알림 시간별 소리 지정 기능
- 초기 페이지 꾸밈 기능 (사진, 소리)
- 알림시 첫페이지에 저장된 사진도 같이 보여줌
- 통화중, 매너모드에서는 소리 나지 않음(진동이 3초간 울려서 알려줌.)


★ 설정 방법
step1 알림소리녹음
: 필요한 알림 소리를 녹음합니다.
step2 알림시간설정
: 요일별 시간별로 알림 시간을 선택합니다.
step3 시간별소리설정
: 설정된 시간별로 알림 소리를 지정합니다.


★ 문의
     hiapps.net@gmail.com


*스크린샷

1.png  2.png


2_2_1.png 2_2_5_1.png


■ [마켓 다운로드]

https://market.android.com/details?id=net.hiapps.voice.ad


qr_code.jpg

posted by 박황기